Lash lift process consists of two distinct procedures, each of which is designed to give you lovely, fluttery eyelashes for several weeks. The effect of the lash lift is similar to that of an eyelash curler. It causes your lashes to stretch upwards, giving them a longer appearance and making your eyes appear more open and bright. Meanwhile, using many coats of mascara or adding a lash tint is akin to applying a brow tint. It gives your lashes a darker, thicker, and fuller appearance. On individuals with naturally blonde or red lashes, it’s more striking.

 LASH LIFT PROCESS:
The Lash Lift treatment involves lifting your natural lashes to create a ‘bright-eyed’ look. In most cases, a Lash Lift may be broken down into three simple steps:
 Step 1:
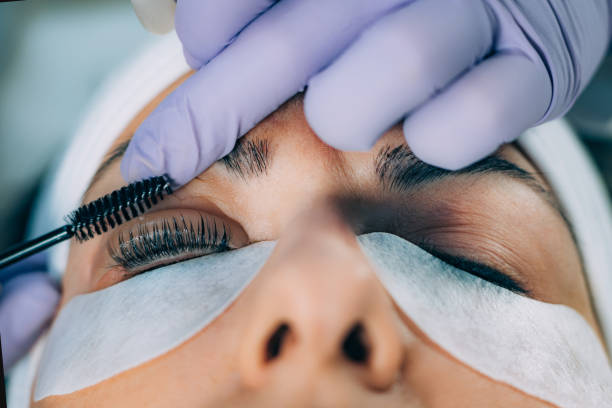
Your lash artist will first conduct a thorough consultation with you to learn about your preferences for the sort of curl you want from the Lash Lift treatment. After that, your eyes will be thoroughly washed, and your natural eyelashes will be softly attached to the chosen silicon pad on your upper eyelids.
The size of the silicone pad to be used is determined by the length of your lashes. The silicone pad’s slanted design acts as a basis for curling your lashes. It’s natural to feel a tiny ‘tightness’ in your lash area, as this indicates that your lashes well adhere to the silicon pad.
Step 2:
Once your lashes are properly positioned on the silicone pad, apply a keratin-infused lotion on your lashes for roughly 10-15 minutes. During the procedure, you should not experience any pain or discomfort. It will be beneficial to keep your eyelids closed so that no lotion enters your eyes.
It might be an excellent time for a quick beauty nap! It will be followed by a setting cream to keep your curled eyelashes in place after 10–15 minutes. This will take another 10–15 minutes, and by this time, you may have fallen asleep.
Step 3:
After your lashes have been set, you can apply a lash tint to make your lashes a darker shade of black. (Yes, you are capable of doing so!) Most people are unaware that Asian lashes are naturally dark, and that a tint will be enough to give them a dark mascara boost. Another 10–15 minutes will be needed for the tint.
Otherwise, your lashes will be completely cleaned before being moisturized with a Filler Lash Lift lotion. Although it may appear to be a lengthy procedure, the Lash Lift procedure only takes about 45 minutes to perform. What a no-fuss approach to beauty!
| Step 1 | Lash Lift Consultation |
|---|---|
| Step 2 | Clean the Lashes |
| Step 3 | Apply Lash Lift Rod |
| Step 4 | Apply Lashes to the Rod |
| Step 5 | Apply Lash Lift Lotion |
| Step 6 | Remove Lash Lift Lotion |
| Step 7 | Apply Lash Set Lotion |
| Step 8 | Remove Lash Set Lotion |

WHAT IS THE DURATION OF THE RESULT?
Depending on how quickly your eyelashes develop and how well they are cared for, the results can last five to seven weeks. Lash Lifts require very little upkeep, but keeping them clean may help them last longer. Consider using a tint to darken your lashes and create a more noticeable mascara-like effect.
Summary:
The Lash Lift treatment lifts your natural lashes to create a ‘bright-eyed’ look. Although it may appear to be a lengthy procedure, it only takes about 45 minutes to perform. Depending on how quickly your eyelashes develop, the results can last five to seven weeks.
What is a lash lift?
A lash lift might be compared to a perm for your eyelashes. A lash lift, unlike lash extensions, just changes the shape and color of your existing lashes. "Most people’s lashes grow out instead of up. “However, upward rising lashes will produce a more cosmetically attractive appearance,” says Dr. Josh Zeichner, a board-certified dermatologist.
Facts about Lash Lift:
What happens when you get your lashes lifted?
When you arrive for your first lash lift, you can anticipate being seated on a bed (similar to the one used for waxing). Unlike wax, though, you won’t be able to see or use your eyes (and hence your phone) for the duration of your visit. It isn’t painful, but it can be irritating. Your eyes may cry a little, but this will not affect the operation.
There are only three steps to the appointment. Silicone pads are first applied to the (closed) eyelids. After that, your lashes are raised and serum is applied. "The first serum breaks down the protein in the lashes. Imani explains that the lashes are molded onto the shield, which “breaks down the lash to take shape.”
A keratin-infused repairing serum is next applied, which, according to Imani, “begins the process of healing and nourishing the lashes.” The silicone pads are removed and the tint is applied. Finally, the lashes are given a coat of pure keratin, which adds an extra layer of protein to strengthen and condition them.
Is a lash lift going to hurt your lashes?
If done correctly, lash lifts will not harm your lashes. Getting your lashes raised usually inspires you to naturally grow longer lashes and better care for them. After a lift with coconut oil, I advise my customers to hydrate their lashes.
How do you keep your lash lift looking good?
The first 48 hours following a lash lift are critical for sustaining those lovely results, so stay away from water (and mascara), strenuous exercise (or anything that makes you sweat a lot), and showering—at least in any fashion that exposes your lashes to the water.
Imani suggests combing the lashes out every morning and evening after 48 hours before applying a lash serum. She commonly advises coconut oil, which you presumably already have in your cupboard, but LashFood’s Phyto-Medic Eyelash Enhancer is also a fantastic option.
Summary:
If done correctly, lash lifts will not harm your lashes. Imani suggests combing the lashes out every morning and evening after 48 hours before applying a lash serum. Lash Food’s Phyto-Medic Eyelash Enhancer is also a fantastic option.
Is it possible to wear mascara on top of a lash lift?
Yes, but never when it comes to waterproof formulations. “Waterproof mascara dehydrates the lashes to stay on, which causes lash breakage,” Imani adds.
Are lash extensions safe?
Yes, in a word. “When done correctly,” Dr. Zeichner explains, “the technique is relatively safe.” There are no hazards, he says, such as skin irritation or allergies to the eyepatches or chemicals used in the surgery.
“If the perming chemicals are left on the lashes for too long, they can cause lash breakage or damage, and the dye used in tints can cause allergies or direct irritation if they come into touch with the skin.” As a customer, make sure to read reviews, see before-and-after photos, or ask a trusted friend for a referral.
What’s the Difference Between Lash Extensions and Lash Lifts?
Lash lifts are usually less expensive than eyelash extensions. Lifts will cost between $75 and $100, and extensions will cost around $150 for a new set. Lash lifts are also easier to maintain. “Extensions replace eye makeup, but a lift eliminates the need for a lash curler and heavy mascara,” Starr explains, recommending the service to anybody looking for a low-maintenance option.
There is minimal after-care
For the first 24 hours after the operation, Starr recommends not wearing eye makeup, getting your lashes wet, or utilizing oil-based products. But aside from that, there’s not much you can do to maintain your newly elevated lashes. Return six to eight weeks later for a second treatment, when your lashes will begin to restore to their natural curl.
Your Lash Technician Should Be Researched
Make sure you find a lash technician who specializes in lash services when you’re looking for one. Before your visit, Starr suggests doing some research on your tech and checking at customer images and reviews. You are also welcome to schedule a consultation before making an appointment.
Before undertaking any aesthetic procedure, especially one that involves your eyes, you should do your research. If you’re concerned about COVID-19, make sure to inquire about the salon’s general COVID-19 precautions.
Lash Lifts and Lash Tints are a great combination
Lash tinting is the process of darkening your lashes with a specific dye, giving you weeks of ultra-black lashes without the use of mascara. This looks great with a lash lift and gives lashes a natural, full appearance. The treatments can be done in a variety of locations at the same time.
Waterproof Mascara should be avoided
“Waterproof or smudge-proof mascara strips the treatment and will impact its duration,” Starr adds, adding that while skin-care and eye treatments are fine to use with a lash lift, “waterproof or smudge-proof mascara shreds the treatment and will damage its longevity.” If you want your curl to endure the whole six to eight weeks, you’ll have to stay away from waterproof mascara formulas.
Summary:
Lash extensions are safe when done correctly, Dr. Zeichner says. There are no hazards, such as skin irritation or allergies to the eyepatches or chemicals used in the surgery. Lifts will cost between $75 and $100, and extensions around $150 for a new set. Lash Lifts and Lash Tints are a great combination. The treatments can be done in a variety of locations at the same time.
Frequently Asked Questions:
Usually many people ask question about this keyword, some of the questions about this keyword are given below;
1: Is a lash lift worth it?
A lash lift is a terrific option if you enjoy your natural lashes and merely want a more wide-eyed look, or if you prefer a more natural look and don’t want to use mascara. Even though it doesn’t add any length, the curl makes my lashes appear longer and opens up my little eyes.
2: Can you still wear mascara with a lash lift?
Eye makeup and mascara are OK, but waterproof versions should be avoided. “While mascara isn’t required for enhancing lift, sticking to water-based mascaras is the best option,” Ocot advises.
3: What happens if you cry after a lash lift?
Water-resistant lash extensions are available. It’s crucial not to cry throughout the procedure because tears can spread the glue/vapors, creating irritation. Crying throughout the process will make the adhesive cure and adhere the extension to your lashes much more difficult.
4: How long do lash lifts last?
Depending on how fast your eyelashes develop, the benefits usually last four to six weeks. “No makeup or water should come into contact with your lashes for 24 hours to ensure the lift properly sets into form,” says the expert.
5: Can you go blind from Lash Lift?
If chemicals get into the eyes, they can cause blindness. “At-home lash lift kits are risky,” warns Dhruvin Patel, a top optometrist and founder of Ocushield. “There’s a good chance you’ll hurt your eye or the structures around it with toxic substances like ammonia, formaldehyde, and lead.”
6: Are DIY lash lifts safe?
No, DIY lash lifts are not safe to perform at home. There’s a reason why most lash lift kits available online are only for expert use. “Using chemicals on your lashes could irritate and potentially harm the cells on the surface of your eye,” says the author.
7: Do lash lifts work on everyone?
However, not everyone responds to lash lifts in the same way. They provide a curl to your hair, but not length or volume. If your lashes are short, thin, and straight, a raise isn’t going to help you much. Lash lifts are helpful for persons who have long, straight, or downward-pointing lashes.
8: Can I use micellar water after lash lift?
Because water interferes with the setting process, wait at least one day after your lash lift before washing your face, showering, or swimming. You may also cleanse your skin and remove makeup using a cotton pad soaked in micellar water—just don’t get it on your lashes.
9: What happens if I get my lash lift wet before 24 hours?
Water or moisture should not be brought into contact with your lashes for at least 24 hours following a lash lift, as water will modify the disulfide bonds in the hair’s cortex once they have set due to chemical alteration.
10: How do I remove mascara with a lash lift?
Waterproof mascara can only be removed with an oil-based makeup remover. The oil in the product will cause your lash lift to break down more quickly. You should also probably wait 24 hours after implementation to get your eyes wet and 24 hours before wearing any eye makeup to make it last longer.
Conclusion:
Getting your lashes raised usually inspires you to naturally grow longer lashes and better care for them. If done correctly, lash lifts will not harm your lashes. There are no hazards, such as skin irritation or allergies to the eyepatches or chemicals used in the surgery. Lash lifts are less expensive than eyelash extensions and are easier to maintain after they’re done. Lash Tinting is the process of darkening your lashes with a specific dye.