Your WiFi is too slow? Before you buy a new router, read our tips. They will get your WiFi up and running again - for free or for little money.
With a kinked LAN cable, you can immediately see where the home network’s speed problem lies. Even without obvious external damage, it’s easy to find the problem. With WiFi, it is more difficult to detect weak points - but with the right tools, this is not a problem.
Wireless network
You can even use them to see the wireless network: This makes it all the easier for you to increase the WiFi range through targeted tuning. We present tools and tips that you can use to improve the WiFi speed. And if those aren’t enough, you can easily expand the wireless network with inexpensive or even discarded hardware.
Find a better place for the router
The router is the base station for WiFi in the home network. Therefore, all devices that transmit via wireless network should have the best possible connection to it. In most cases, however, the WiFi router also serves as a DSL modem: That’s why it’s often located near the telephone connection, i.e. rather downstairs and in a corner of the apartment.
This, in turn, is the worst place for good WiFi. To ensure that radio waves propagate as unhindered as possible, the router should be elevated - on a shelf, for example - and in the middle of the area that its WiFi is supposed to cover. This is because almost all routers use omnidirectional antennas that emit the WiFi signal almost spherically in all directions.
Optimal placement
So, for optimal placement, you should move the DSL router away from the phone socket. The easiest way to do this is with a longer DSL cable between the TAE socket and the router’s WAN port. A cable length of up to 20 meters should not be a problem, but a greater distance is also possible: How far you can extend the DSL line at home depends on how far your DSL connection is from the DSL provider’s exchange, because the longer this “last mile” is, the more the data rate suffers from signal attenuation.
Ready-made 20-meter cables cost around 20 euros. Self-assembled cables are cheaper: You can read how to connect them correctly to the TAE plug using the Fritzbox as an example.
Telephone socket
If you do not want to lay a long cable through the apartment, the telephone socket must be closer to the optimal router location: This is expensive or time-consuming. At Telekom, laying the telephone socket costs 100 euros, including ten meters of installation cable. You can also install an additional telephone socket yourself and connect it to the first TAE socket via telephone cable. But here, too, you must lay the cables as inconspicuously as possible.
Router internet access
You have the same problem if a DSL or cable modem rather than the router provides Internet access. In this case, you can use a standard Ethernet cable for the connection to the router and thus bridge up to 100 meters. But here, too, the cable should be laid in such a way that it does not become a tripping hazard.
If you cannot move the router, you might achieve a better WiFi connection if you place it vertically instead of horizontally or turn it a bit: This causes the radio waves to take a different path, via which they then reach WiFi clients such as the PC or TV with less interference.
Tip: A USB 3.0 hard drive or stick on the router may also interfere with WiFi transmission over 2.4 GHz: This can happen with poorly shielded USB ports. If you still want to use the mass storage device at the router as a NAS, look for an option in the router menu that reduces the USB transmission to 2.0 speed to exclude interference with the WiFi.
Analyze signal strength with Inssider
How undisturbed are the signals now getting from the transmitter to the receiver? The English-language tool Inssider Home presents the relevant information most clearly. Install the program on a computer that is connected to the WiFi router.
Then select the “Networks” menu. Inssider shows you all the wireless networks that the WiFi adapter in the PC can reach. You can recognize the WiFi it is connected to by a color icon and a star. In addition, its entry in the list of detected WiFis is highlighted in color.
The information about the signal strength in the “Signal” column is important. Because from this you can estimate how stable the WiFi connection between router and computer is. Inssider displays the value in the unit dBm as a negative number - the closer it is to zero, the better the signal.
At values below -60 the connection is very stable, at -60 to -80 it is still sufficient. If the values are worse, you should check whether you can position the router or computer differently so that the signal propagation is less obstructed. You should also move obstacles such as furniture that interfere with the signal path - if possible.
Then use the colored line for the signal path in Inssider to check whether the signal strength has improved as a result. If you get stuck with this simple method, you can use Ekahau Heatmapper to track down signal problems in more detail.
Detect WiFi weak spots with Heatmapper
You can use WiFi devices like smartphone and tablet only where your WiFi still reaches at high speed. But it’s better if you uncover the wireless holes in your WiFi and improve range and speed there.
The most thorough tool for this is Ekahau Heatmapper , even though the program is now around four years old. With the software, you create a heat map of your WiFi. These maps use colors to show you where WiFi reception is and how good it is: green indicates an optimal connection, orange indicates medium range, and red indicates WiFi problem areas. When you download Heatmapper from the provider’s website, you have to register via email. You will then be sent a download link there.
Install Heatmapper on a notebook. Windows warns you that the tool comes with a protocol driver. But you need it for the program - so confirm the installation. At the first start you can select whether you want to store a floor plan of the apartment in Heatmapper. In most cases you will not have one.
So start with an empty sheet. You will then see the WiFi routers that the notebook can reach on the left, an empty checkered area in the middle where your range map will be created, and a help menu on the right. You can hide that by clicking the arrow on the right.
On the left, the WLAN routers are sorted by signal strength. Ideally, your own router should be at the top. Now start a tour of the apartment with your notebook. With each mouse click, Heatmapper records the signal strength of the routers at the point where you are currently standing. Walk through the apartment, clicking at regular intervals.
To stop the measurement, perform a right-click. Now Heatmapper colors the map and you can see at first glance how far the WLAN reaches - the greener, the better. All WLAN routers are also recorded on the map. If you move the mouse pointer over a router icon, you will see the heat map from its point of view.
The display of the heat map corresponds to an average of all networks. To save the heatmap, show the WLAN list on the left again and click “Take Screenshot”.
The heat map measurement always refers to the device you are using to perform it. If the notebook in a certain room only has a moderate connection to the router, this does not necessarily apply to another laptop, tablet or smartphone. However, our field tests show that Heatmapper’s color coding can be applied to other devices as well.
In the green area, which signals a signal strength of -64 dBm or better, most tablets and smartphones also achieve a WLAN quality that is still symbolized with four to five bars. It becomes critical at a signal strength of -85 dBm or weaker: Then most mobile devices only show one bar or the connection even breaks off.
Exclude double radio channel
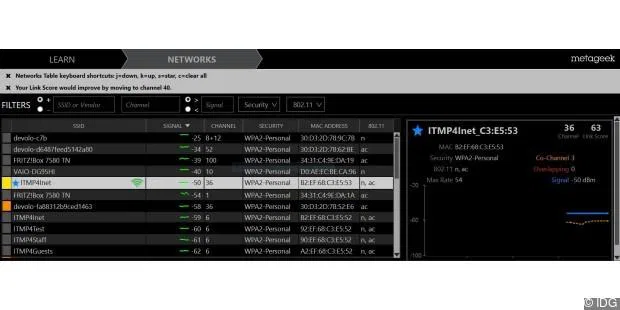
In the Inssider tool, you can see details about the WLAN to which the computer is connected in a window to the right of the network list. The information “Co-Channel” and “Overlapping” are particularly important. They show whether another WLAN is transmitting on the same radio channel as yours or whether an interfering WLAN is using a channel range that overlaps with your own WLAN. Optimal is, if Inssider shows a zero for both categories.
Overlapping channels
If Inssider detects other WLANs that use the same or overlapping channels, you should check whether there is a channel on which no wireless network is interfering. You can see this in the lower part of the tool: There you can see in two diagrams - on the left for 2.4 GHz, on the right for the 5 GHz band - on which radio channels the detected WLANs are transmitting; your own radio network is also highlighted in color here.
Channel Frequency
Each channel covers a frequency range of 5 MHz. For a transmission, however, a WLAN component always combines several channels so that a frequency range of 20, 40 or 80 MHz results. Since there are only 13 radio channels in total over 2.4 GHz, only WLANs that transmit over channels 1, 6 and 11 do not interfere with each other.
Over 5 GHz, there are significantly more channels available: Inssider therefore only shows the channels in the diagram that cannot overlap, for example 36, 44, 52 and 60. If the WLAN adapter of the computer also supports the 5 GHz frequency, you should use this and set one of the free channels in the router. If there is already another WLAN on each channel, select the channel with the fewest wireless networks.
It is more difficult with 2.4 GHz: Here, you should select one of the overlap-free channels 1, 6 or 11 - the one with the fewest external WLANs. This reduces the transfer speed somewhat because the WLANs share the channel and can therefore only transmit one after the other - your WLAN can only transmit when nothing is happening on the other networks.
More disruptive are WLANs that operate on an adjacent channel, for example 5 or 10, whose transmission range overlaps with your WLAN if it occupies channel 6 or 11.
However, since the two wireless networks use different main channels, they do not take each other into account: If both networks transmit, they interfere with each other and the transfer rate drops because not all data reaches its destination and the transmitter therefore retransmits it.
The WLAN analysis you perform with Inssider only applies to the device on which the tool is installed. On another computer in another room, the result can look completely different in terms of signal quality and interference. Therefore, you should install the tool on all computers for which you want a stable and fast WLAN connection and examine the wireless network.
More tips to improve the range
After you have analyzed the WLAN with Inssider and Heatmapper, you should eliminate the wireless holes. The first step is to get the latest drivers and firmware for WLAN clients and the WLAN router. For complete PCs and notebooks, Windows Update helps with the driver search or the service page of the system manufacturer. You can obtain the latest router firmware from the manufacturer.
Change the antenna position of the router:
Most routers have omnidirectional antennas. They transmit the radio signal relatively evenly in a slightly flattened spherical shape, at an angle of 90 degrees to the antenna axis. So if you want to reach WLAN clients on the same floor, the antennas should be oriented vertically.
WLAN routers with internal antennas
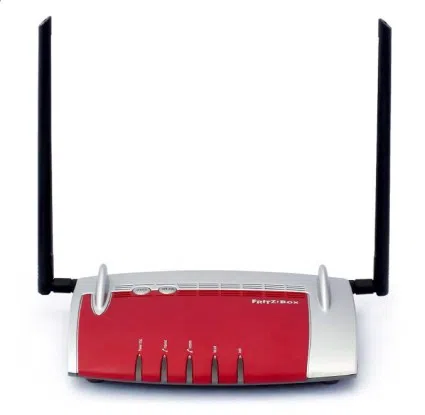
For WLAN routers with internal antennas like the Fritzbox, trial and error helps Depending on the desired radiation direction.
you should set up the router horizontally or vertically. Always helpful: Position the router in the center of the area it is to illuminate - and set it as high as possible so that the radio waves can propagate unhindered.
The transmission power of the router should be set to maximum:
On the Fritzbox, you can see the transmission strength under “WLAN → Radio channel → Maximum transmission power”.
You can also tune in the WLAN clients:
If you establish the WLAN connection on the PC or notebook via USB stick, use an extension cable: This allows you to adjust the position of the WLAN stick for better signal transmission.
New Routers Technology
Current routers also offer many features that allow them to order WLAN traffic to improve speed across the network.
For example band steering which redirects clients to the better frequency band using wider radio channels such as 40 MHz over 2.4 GHz and 160 MHz over 5 GHz.
Beam forming also improves router antenna performance toward a particular client. Multi-user mimo, which allows the router to serve multiple clients at the same time instead of one after the other.
Conclusion
Enable these features if you can find a suitable entry in the router menu. However, the clients must also support these features to make the wireless network faster.