How to Draw Eyes in Easy Way?

How to Draw Eyes in Easy Way?

Begin by creating a basic almond-shaped outline of the eye’s inner circle, which includes the eye’s pupils and highlights. Complete the upper and lower eyelids of the pupil. To begin, sketch out the eyelashes’ shape. Lines and Lashes can be accentuated with a few darker shades.

hand-drawn-female-eye

Each of us, as artists, has experienced that moment of awe and awe-inspiring amazement with the gaze of others. Moreover, this isn’t a secret, as the eyes are the most expressive and often the most distinguishing part of a person’s face. We also find ourselves in a pit of misery when we try to sketch them since they are so difficult to overlook and depict.

Drawing eyes is a skill that can be learned, but I’ll try my best in this essay to help you unravel the secrets of drawing eyes and to show you how to do it without suffering too much. I hope you find this article helpful.

:pencil2: Materials Needed

1 A sheet of paper
2 A tool for navigating by using a compass
3 A king or queen
4 One of the many tools for mixing
5 An erasable surface
6 Gel pen/fine liner in white
7 The gradation of graphite pencils Numbers 2, 4, and 8

:diamonds: How to Draw a Realistic Female Eye

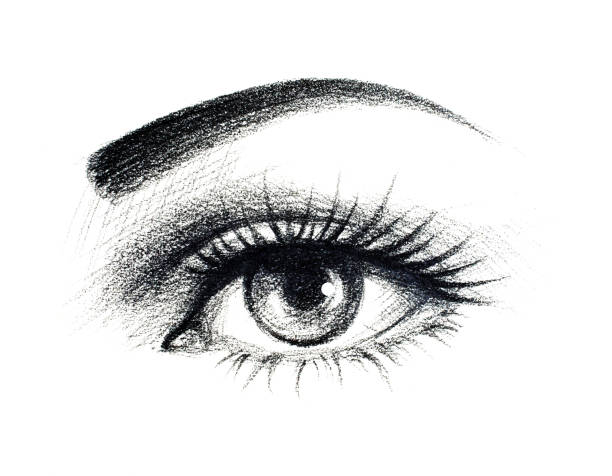
It might not be easy to draw female eyes because of the variety of eye forms and characteristics. To begin, draw out the shape of the eye and the upper portion of its brow. You may add highlights and shadows to the eye with a kneaded eraser and a blending stump. Even a novice artist may produce a convincing representation of the eye with a little patience.

:pencil2: Sketching the Outline of the Eye and Eyebrow

Using a pointed pencil, create an oval or seed-like form that’s as large as you like the eye to be. Draw a little half-circle around the inner eye area. The tear duct is located here. If possible, sketch directly from life or use a reference photo.

:pencil2: The iris and the pupil should be outlined.

To make the iris, lightly draw a circle that occupies roughly half of the eyeball. It is best if the eyelid partially obscures the circle to provide the illusion of depth. Then, draw a tiny circle in the eye’s middle to create the pupil. Compasses and spherical objects can be used to draw circles when sketching is difficult. It’s important to remember that the illumination determines the size of the pupil; thus, if you’re sketching a person outside, the pupil will be tiny. Drawing a woman’s eye in poor light requires a bigger pupil. If you need to make any adjustments, softly press the pencil in place.

:pencil2: Use curved lines to create long eyelashes.

Long, thick eyelashes may be achieved by drawing curving lines above and below the eye. Using a flicking motion, make a series of little strokes across the upper eyelid in a zig-zagging manner. Mascara can make the woman’s eyelashes appear bigger or darker. Allow a slight space between the lower eyelid and the eyelashes. It’s not uncommon for lower eyelashes to be less full or longer than upper eyelashes.

:pencil2: Create a curved brow line.

Give your eyes depth by drawing a curving upper lid. The curled lid may be made as near or far from the lash line as you wish. It’s up to you. For some ladies, the upper eyelid doesn’t have any discernible curves. Therefore you may want to place it near the eyelash line. You don’t need to do anything with the upper eyelid now.

:pencil2: Sketch a faint outline of the eyebrow.

The woman’s brow should be lightly outlined along the brow bone. For example, it might be thick or thin, arched, wispy, or defined. Once you’ve completed drawing the remainder of the eye, you may fill it in.

  • Right over the eye socket, you’ll find your brow bone.
  • Hairs near the top of the eyebrow should point upwards, while those at the centre should be drawn horizontally, as seen in this diagram. After that, make sure the hairs on the periphery point downward.

:pencil2: Outline areas

Decide where you’d want to leave open spaces to allow natural light in. Using a light brush, trace the contour of the light reflected in the woman’s eye. For example, if a light is reflected from a window, you may draw a tiny square at one side of the iris. A circle or oval can also be used for the emphasized form.

:pencil2: Draw a circle around the iris’s central ring.

The eye’s iris will likely be darker around and beyond the pupil. Use a pencil to softly draw the iris’s ring in the centre so that the centre remains a lighter shade than the borders. The reflection you blacked off previously should not be sketched over.

:pencil2: Inscribe an eye slit

Add colour to the eye’s pupil and darken the iris’s outline. Make the pupil completely black by applying a lot of darkness to it. Next, apply pressure while drawing a line through the outlined area and around the reflection you just blacked out. Use a darker pencil, or run over the outline multiple times, to make it seem dark. The area of the iris that will be highlighted should not be drawn or filled in any way.

:pencil2: Sketch spokes

As you trace the iris’s highlighted portion, draw spokes radiating from the pupil. Now that you’ve blacked out the darker area of the iris, you may begin filling it in. Using a pencil, draw lines from the pupil toward the iris’s outer edge. To create a more realistic iris, employ shorter, darker strokes around the pupil. Use a few forceful strokes to provide the illusion of a distinct iris. It should not have a uniformly smooth surface.

:pencil2: Use an eraser or blending stump to lighten the iris.

Using the eraser of your pencil or a paper blending stump, lightly blot the extra graphite from the paper if you discover that you made the iris too dark. Continue erasing or mixing until the iris is as light as you like. A dark eyelid may not necessitate a re-do if you’ve already drawn it.

:beginner: Summary

Curved lines above and below the eye can be used to create long, thick eyelashes. Make a series of zig-zagging motions across the upper eyelid with a flicking motion. Eyelashes can be made to look longer or darker by applying mascara. Give the lower eyelid a little breathing room. Lower eyelashes may be sparser or longer than those on the upper lid.

:small_red_triangle_down: Frequently Asked Questions - FAQs

1 - Is there symbolism to the eyes in art?

Doodling eyes reveals a person’s inner thoughts and feelings. With huge eyes, you are more confident. Looking someone in the eyes conveys a sense of being watched. Closing one’s eyes might be a sign of indifference.

2 - What is the significance of eyes in art?

Our eyes tell us who we are, our intentions, and how we can empathize with one another. The first thing we notice about a work of art is whether or not it makes eye contact with us.

3 - Why do I keep drawing circles?

As a symbol for finding togetherness and peace, circles are used. They may signify a person who is having a difficult time putting their thoughts together. As a metaphor for life or one’s relationships, it may suggest a strong intuitive sense that things are coming together.

4 - Why do my drawings appear to be so flat?

Less light is reflected with a lower luminance rating, resulting in thicker shadows. As a result, shading a shape creates the appearance that it has form or mass and occupies a certain amount of space. The result is that it seems less flat.

5 - What is the name for the shape of the eye?

In medical literature, the eyeball is referred to as a “globe.” Eyeballs aren’t exactly round, just like our globe isn’t round. The diameter of a real spherical is the same from top to bottom, side to side, and front to back.

6 - Are there more than one sort of eye colour?

The six primary hues used to describe iris rhizomes are: blue, brown, grey, green, hazel, and red. Amber eyes are sometimes mistaken for brown eyes because they lack the blue or green specks that characterize hazel eyes.

7 - Why do you think drawing is beneficial?

Like many other kinds of art, drawing helps us unwind and de-stress by requiring us to focus on the small aspects of our surroundings, much like the meditative experience. In addition to relieving tension and improving attention, sketching on the spur of the moment is also reported to do so.

8 - What are the five fundamental sketching skills?

When sketching, these five fundamental abilities are all you need to get started. When these five drawing talents are put together, they form the building blocks of a finished piece of art.

:open_book: Conclusion

A graphite pencil or blending stump can be used for this purpose. In addition, you’ll want to deepen and integrate the skin around the crease of your upper eyelid. You may use a clean blending tool to blur or erase the browbone to make it stand out more.
It might not be easy to draw female eyes because of the variety of eye forms and characteristics. A few simple criteria might help you create a picture that seems like a real person drew. To begin, draw out the shape of the eye and the upper portion of its brow. You may add highlights and shadows to the eye with a kneaded eraser and a blending stump. Even a novice artist may produce a convincing representation of the eye with a little patience.

:paperclips: Related Articles

1 - Learn to draw

2 - Drawing practice

3 - Drawing tutorials for beginners

What Are Eyes?

The human eye is an ■■■■■ that reacts to light and allows vision. Rod and cone cells in the retina allow conscious light perception and vision including color differentiation and the perception of depth.

Easy way to draw eyes:

I love to draw, and one of the hardest things for me to draw is facial features, like an eye.
This is a tutorial on how to draw the eye below. It is fairly simple but may take a few tries to get right, so keep trying!

You will need:

2 Different kinds of pencils. A dark 6B or 8B, and a lighter HB An eraser Paper flat surface, like a table or clipboard to draw on.

Also, don’t forget to rate!

Step 1: Outline

Okay, to start, draw the basic almond-shaped outline of the eye. Try to make the inner corner (next to the nose) lower than the outer corner. P.S, I’m very sorry the pictures hard to see, my scanner made it very light.

Step 2: Inner Circle

Now draw the inner circle of the eye.

Step 3: Pupil and Highlight

Draw the highlight first, then the pupil under it. Make sure the pupil is in the center of the circle.

Step 4: Fill in the Pupil

Use your dark 6B or 8B to fill it in. You want it as close to black as possible.

Step 5: Upper and Lower Eyelid

Draw the crease of the upper eyelid, and the bottom one too. I’m not sure if its called the lower eyelid, but its the line under the eye.

Step 6: Begin Drawing the Eyelashes

Draw a few eyelashes to show where you will later draw in larger clumps of lashes. Kinda like a basic outline. Sort of.

Step 7: Darken a Few Things Up

Darken the inner circle in the eye, the outline of the eye, and draw a line in the inner corner (as shown in the picture)

Step 8: Lines and Lashes

Start filling in some more lashes, and add some lines inside the inner circle of the eye.

Step 9: Lines Lines Lines

Fill in some more lines lightly inside the circle

Step 10: Lines Lines...

Add even more lines! But this time uses the darker pencil to make darker lines.

Step 11: Adding Some Depth

Okay, shade in the inside outer edge of the inner circle of the eye ( yes, that is a lot of words ). Use the darker pencil. This will add a lot of depth and roundness to the eye.

Step 12: More Depth

Alright, do what you did in the last step to the pupil. Also, add some more lines (depending on the lightness of the color of the eye) to make it a little darker in some areas.

Step 13: Lashes!

Now, really fill in the lashes with your darker pencil. If drawing a male eye, make the lashes a little lighter than if drawing a female eye. In this instance, I am drawing a female eye.

If u need to Shade inside the eye, and it helps to smudge it with your fingertip or a tortillon.

How To Draw Anime Eyes

Female Anime Eye Specifics (Before You Start Drawing)

Anime eyes are almost always drawn bigger and wider than real eyes. This is especially so for female characters who often have larger and wider eyes than their male counterparts.

One thing that really sets female anime eyes apart from the male is more prominent eyelashes (longer, thicker, and more of them). This is not always the case but it does tend to be so.

Be sure to make light lines for the line drawing part of the tutorial (if drawing on paper) as you will need to do some erasing through the different steps. You can go over your drawing with a more solid line once you are done.

1 – Draw the Outer Shape of the Eye

Start the drawing with the outer shape of the eye. In this case the eyelids/eyelashes.

2 – Draw the Shape of the Iris

Draw the iris vertically stretched (compared to a real eye). Basically an oval with the top and bottom are hidden by the eyelids.

3 – Draw the Pupil

Inside the iris draw the pupil tracing the shape of the iris but smaller.

4 – Indicate Dark Area at Top of Iris

Make a line towards the upper half of the eye that will indicate the darker area partially created by the shadow and the eyelashes reflecting in the eyes.

You can erase the line overlapping the pupil in the next step. The reason for drawing it all the way through like that is to make sure that both sides match up and that you have a nice and smooth curve.

5 – Draw the Primary Reflection

Draw the main reflection area from the main light source such as an indoor light bulb, a fire, or the sun. You can erase the area of the pupil and shadow that is overlapped by the reflection.

The shape and color of the reflection can depend on the shape and color of the light source. Usually, in anime, you can simply leave the reflection white and give it a very generalized shape like a circle or an oval.

6 – Draw the Secondary Reflection

This reflection will usually come from the light of the main light source bouncing off of a surface and will be smaller than the primary reflection.

Again erase the part of the pupil overlapped by the reflection.

7 – Shade The Different Area of the Eye

Finally, you can shade the different areas drawn in the previous step. If drawing on paper simply leave the reflections white.

Shade the eyelids which are also technically part of the eyelashes black. Shade the pupil black as well.

Finally, shade the iris grey or any color you want the eyes to have.

8 – Add the Outer Top Eyelid Eyelashes

It should be noted that you could stop at step seven of this tutorial and have a perfectly normal anime eye but since the tutorial focuses on female eyes we will add some eyelashes.

The first place you want to add the eyelashes to is the outer corners of the eye. Generally, eyelashes (real eyelashes) sort of fan out around the eyelids so you can draw anime eyelashes in a similar way.

Next, add some smaller eyelashes at the inner corner of the eye.

Since the eyelashes are fairly small you can also shade them as you draw them.

There is no need to add any in the middle as these usually tend to point forward and therefore visually sort of just merge into one shape.

9 – Add the Bottom Eyelashes

Finally, add some tiny eyelashes at the outer and inner bottom corners of the eye to have a finished drawing of a female anime eye.

Frequently Asked Questions (FAQs)

1. How to draw a realistic eye?

Eyes are a beautiful subject to draw—a lot of different materials are combined in them, and they look like precious gems hidden in our own bodies. They’re also quite challenging to draw, but it doesn’t mean you can’t do it!

What You Will Need:

  • Sheet of paper
  • HB pencil
  • 2B pencil
  • 4B pencil
  • 5B pencil
  • 7B or 8B pencil
  • Blending stump
  • Eraser (preferably kneaded)
  • Pencil sharpener
Step 01

Take the HB pencil and sketch a rough oval very lightly. The line should be barely visible.

Step 02

Cross the oval with two curves that will make the eyelids.

Step 03

The eyelids have a certain thickness, so add rims to them.

Step 04

Draw the round iris, the pupil in the middle, the shape of the reflection, and the corners of the eye.

Step 05

The eyebrow is a frame for the eye, so don’t forget about it! Draw it with straight lines to achieve a natural shape.

Step 06

Before we shade the eye, we must understand the 3D form of it. You can work it out by drawing directing lines.

2. How to draw cartoon eyes?

Step 001: Gather Your Materials

To draw an eye, you will need…

paper - pencil - at least two shades of your preferred color - ruler - optional: pen and thin Sharpie.

Step 002: Draw a Guide

To make drawing an eye as easy as possible, you may want to draw a rectangle with room for the eyes so that they are identical. I have an issue with making my eye drawings symmetrical, but I find it much easier to do when I have a guide to assist me. You can use a ruler for this or anything with a straight edge.

Step 003: Outline of the Eye

A cartoon eye has a basic shape that is actually quite simple to draw. To draw the basic outline, draw a circle. Then, add curved lines to both sides of the circle to make an eye shape. Erase the lines from the circle that is left in the middle. Now, we can move onto the pupil, shines, and iris.

Step 004: The Pupil, Shines, and Iris

Inside the eye, draw a large circle towards the top to make the iris or the colorful part. Then, draw a circle about a third of the size of the iris for the shine. Finally, draw a smaller circle beneath the shine for the pupil.

Step 005: Adding the Eyelashes

Next, you have to add eyelashes. To do this, add a curved “tail” to the eye, which is like a cattail that you can make with mascara. Then, add a few eyelashes to the top of the eye and the bottom. Add a few lines for parts of the face such as the eyelid for a more realistic touch.

3. How to draw closed eyes?

A portrait with both eyes closed is a beautiful way to express sensuality and seduction. By following these 8 steps, you will learn how to draw closed eyes that look realistic.

Equipment used to draw closed eyes

  • HB Pencil
  • 2B Pencil
  • Kneading rubber
  • Drawing paper
1: Determine eye size and distance

The basis for a realistic drawing are harmonious proportions. In frontal perspective – as we use it in this tutorial – the distance between the two eyes is one eye width. Depending on the person, the distance between the eyes of a real person differs a little bit, but as an orientation this “one eye distance” works perfectly.

Use a ruler to draw a fine horizontal line on your paper. Divide the total length of the line into 3 sections of equal length. The two outer marks represent the outer corners of the eyes, the inner marks the inner corners of the eyes.

2: Angle and shape of the closed eyes

Next, draw two circles freehand over the 1st and 2nd line, and over the 3rd and 4th lines. Don’t worry. It does not have to be perfectly round.

Erase the horizontal helpline from step 1

Now look at your reference image and draw a new construction line through the center of the circle. This line will give the eye its shape and determine the curve of the lashes. For most people, it is common that the inner corner of the eye is a little lower than the outer one.

3: Draw the eyelids of closed eyes

Now give the new support line a swing that will mark the course of the upper and lower eyelids. It is important that the eyelid line roughly crosses the points of intersection of the support line with the circle in order to maintain the correct angle.

When you are finished drawing both eyelids you can erase the construction line from step 3.

4: Draw the eyebrows

With a small distance above the circles, you can now draw in the eyebrows. The shape of the eyebrows is also based on your reference motif. We have chosen a classic curve and drawn it with a fine border.

5: Drawing closed eyes means mastering shading

To draw the fine curves and curves of the eyeballs, nose and eyebrows, you need to be able to draw soft shades. For this, we use the HB pencil and a kneaded eraser.

However, before you start shading, make sure you erased all supporting lines so that they are not visible anymore. It helps if you did not apply much pressure when drawing these lines.

Next, draw shadows on the bridge of the nose, the eyelids (getting darker towards the outside), and the cheeks. You can do this in layers and alternately soften the newly drawn area with a blending stump to achieve a smoother, more even result.

6: Finishing the eyebrows

If you are satisfied with the shades, you can draw over the eyelid with a 2B pencil and then proceed to draw the eyebrows.

7: How to draw closed eyes – Draw wrinkles

To make the eyes look more real, you can add small wrinkles above the eyelid and draw the eyelid fold. Draw several diagonal lines from the eyelid towards the outer corner of the eye. A ■■■■■■ pencil is recommended for very fine lines.

In order to harmonize these wrinkles with the rest of the shading, you should blend the area. Either use a blending stump and wipe several times or use an HB pencil and shade the area around the eyelid again.

Next, take your kneaded eraser and erase very fine lines in the same diagonal direction. These light lines should be implied where the light hits the eyes.

8: Draw lashes

If you want to learn how to draw closed eyes that look realistic you should pay special attention to the lashes. Start with a few individual lashes, which you spread over the length of the eyelid. Draw the outer and inner lashes a little shorter and the ones in the middle a little longer.

Then take your 2B pencil and fill up the lashes a little more to make them look fuller. Last but not least, you can also darken the eyelid a little where the lashes originate. After all, the little hair cast a shadow here too, which should be marked.

References

References
  1. How to Draw Female Anime Eyes Tutorial - AnimeOutline
  2. How to Draw a Realistic Eye: 9 Steps | RapidFireArt
  3. How to Draw a Realistic Eye
  4. https://www.instructables.com/id/How-To-Draw-Cartoon-Eyes/