How to take a screenshot on a Windows PC? You can take a screenshot on just about any platform, and taking screenshots in Windows is no different.
1 Like
What Is A Screenshot?

Screen capture is a picture taken of anything that’s on your screen.
This article will tell you in detail about how to take a screenshot on a PC.
You can take a screen catch on practically any stage, and taking screen catches in Windows is the equivalent. In this article, you’ll become more acquainted with a couple of various approaches to take a screen capture in Windows.
How To Take A Screenshot On Windows
Technique One: Take Quick Screenshots with Print Screen (PrtScn)
- Press the PrtScn catch to duplicate the screen to the clipboard
- Press the Windows+PrtScn catches on your console to save the screen to a document
- Use the built-in Snipping Tool
- Use the Game Bar in Windows 10
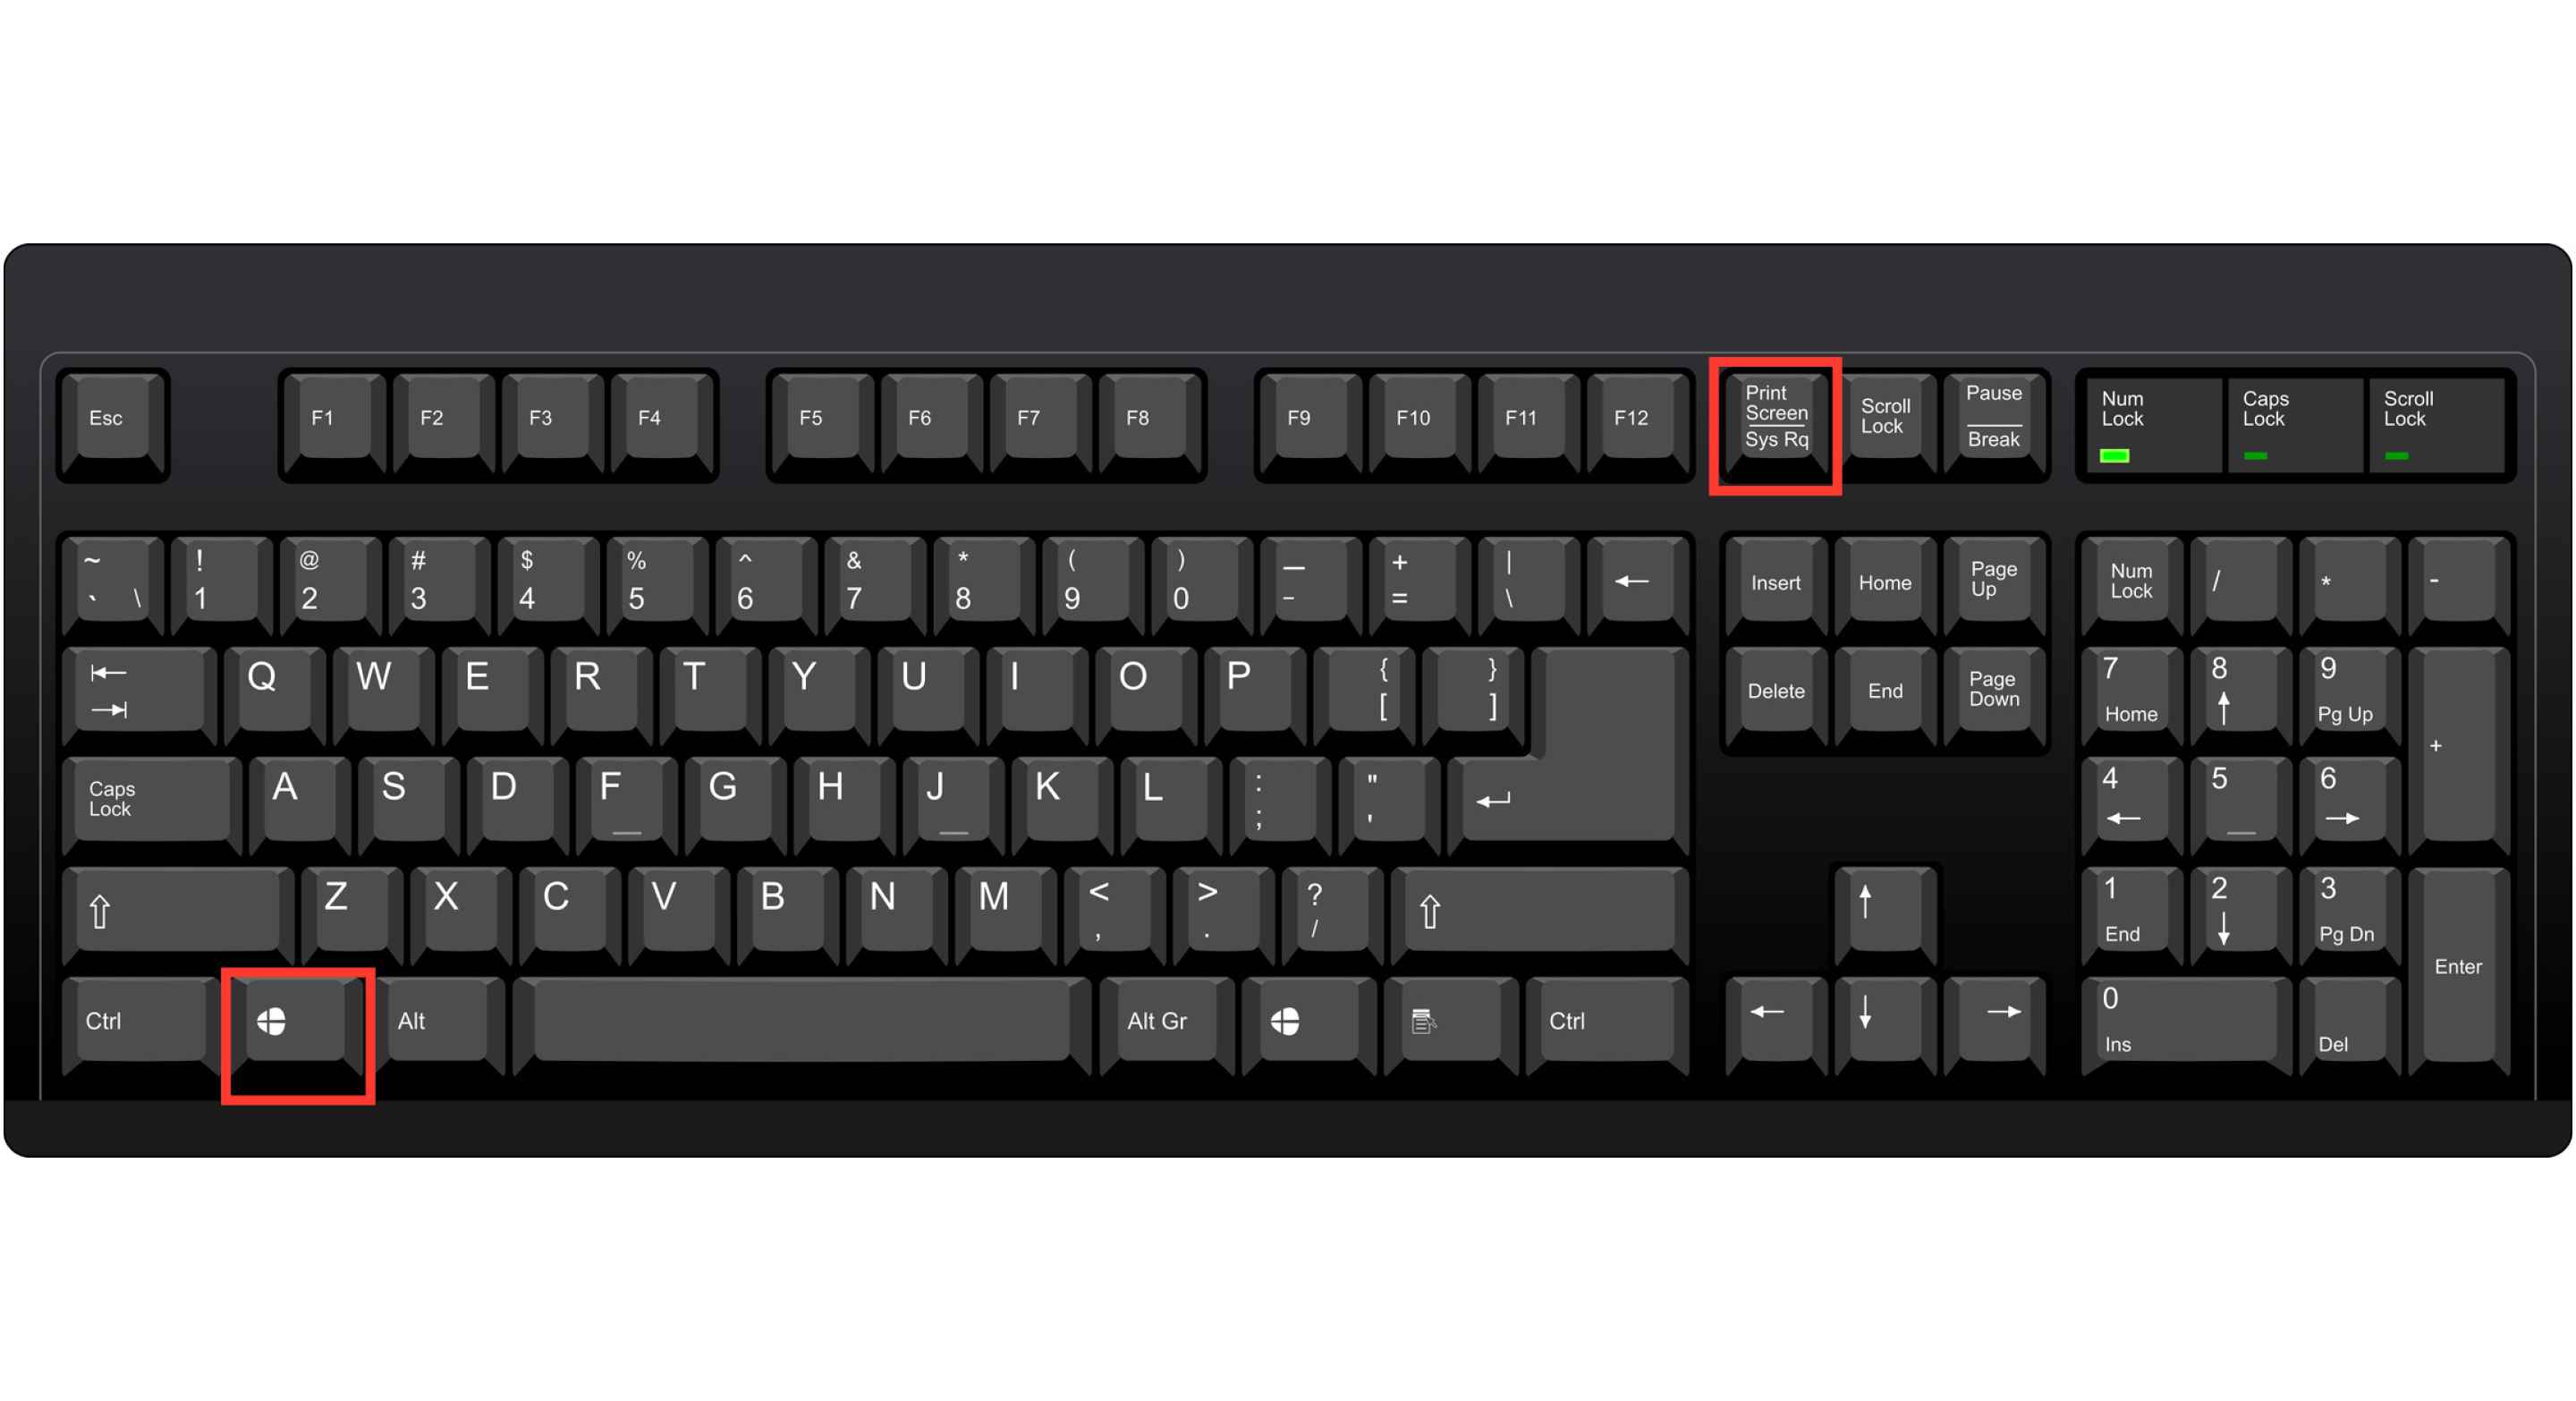
The Print Screen button on your console can take a screen capture and save it as a record, take a screen capture without saving it as a document, or take a screen catch of simply a solitary window (instead of the whole screen). The print screen catch might be named “PrtScn,” “PrntScrn,” “Print Scr,” or something comparable. On most consoles, the catch is normally found among F12 and Scroll Lock. On PC supports, you may have to press the “Limit” or “Fn” key to get to the Print Screen incorporate. At the point when you press the key, it will seem as though nothing occurred, however, the screen capture has been saved to your clipboard.
To Save Your Screenshot as a File
Press the “Windows logo key + PrtScn.” If you’re using a tablet, press the “Windows logo button + volume down catch.” On specific workstations and various contraptions, you may require to press the “Windows logo key + Ctrl + PrtScn” or “Windows logo key + Fn + PrtScn” keys all things considered. Check your PC’s manual for more information.
The screen will lessen momentarily, and you will see the screen catch appear as a record in an envelope named “Screen catches”, inside your default “Pictures” coordinator. The screen catch is therefore named with a number.
You will possibly see your screen faint in the event that you have the “Vivify windows while limiting and expanding” turned on in your special visualizations settings (System > Advanced framework settings > Snap the Advanced tab > Click Settings under Performance area).
Taking a Screenshot of One Window
Click the title bar of the window you need to catch. Press “Alt + PrtScn”. A screenshot of your currently dynamic window is replicated to the clipboard similar to the last segment. Glue it into your #1 picture editorial manager or archive proofreader. Note: On certain workstations and various gadgets, you may need to press the Alt + Fn + PrtScn keys if all things are the same. Refer to your laptop manual for more information.
Method 2: Take more flexible screenshots with the Snipping Tool
The Snipping Tool has long been a part of Windows. This tool was first included in Windows Vista and has not received any new functions apart from a few bug fixes. The Snipping Tool can take screenshots of an open window, a rectangular area, a freeform area, or the entire screen. You can annotate your snips with different colored pens or a highlighter, save them as an image or MHTML file, or email them to a friend.
The Snipping Tool in Windows Vista, 7, and 8 has one limitation: it cannot take screenshots with mouse movements. To capture anything that involves mouse movements, such as pop-up menus and tooltips, you must use the print-screen method.
In Windows 10, Snipping Tool has a “Delay” option, which will allow you to capture screenshots of context menus and tooltips. Open the Snipping Tool application and snap on Delay. From the drop-down list, click the number of seconds you want to wait until your screenshot is taken.
Now choose the type of capture you want to create by clicking on the arrow next to “New capture”. You can choose from one of four types of snip: freeform, rectangular, window, and full screen.
Unlike a regular snip, the screen will not immediately disappear. Instead, you’ll have between 1 and 5 seconds, depending on how long you choose, to set up your screenshots. You can use this time to open the context menu or tooltip that you want to capture. When your seconds are up, the screen freezes and disappears so you can create your snip. If you chose window or full screen, it will just capture the capture immediately.
The most effective method to take a screen capture in Windows 10
Windows 10 released an update in October 2018 that introduced an interesting way to take screenshots. The capture tool is out; Snip & Sketch has entered. (Actually, the capture tool is still running, but Microsoft claims it is being removed.
Here’s how the Snip & Sketch tool works - and other shortcuts for taking screenshots with Windows 10.
Capture and sketch
The Snip & Sketch tool is more accessible and makes it easier to share screenshots. However, it lacks an important feature that keeps me on the Team Snipping Tool. In the Snip & Sketch window, click the Snip button in the upper left corner to start a screen capture.
The Snip & Sketch window will disappear, and in its place you’ll see a small menu at the top of the screen where you can choose what type of screenshot you want to take - rectangular, freeform, or full screen. Surprisingly, it doesn’t offer a way to take a screenshot of a window, which is my job with the Snipping Tool. You can also click the down arrow next to the New button in the Snip & Sketch window to delay a snip by 3 or 10 seconds.
Once you take a screenshot, it will load into Snip & Sketch, where you can annotate it with a pencil, pen and other tools at the top of the window. Your screenshot will also be copied to the clipboard and will contain all the explanations you have made.

Cropping tool
The cropping tool exists under Windows Vista. Open the Start Menu on your laptop or computer and you will see a cropping tool there. Click on it and it will open. Click the New button to start the screenshot process. The standard type is a rectangular segment. However, you can also capture freeform sections in full-screen mode along with the window trim.

The capture tool doesn’t automatically save your screenshots - you have to manually save them to the tool before exiting - and it automatically copies your recordings to the clipboard.
Print Screen
To capture your entire screen, press the Print Screen button (sometimes labeled PrtScn). Your screen capture won’t be saved as a document yet will be duplicated to the clipboard. You need to open an image editing program (e.g. Microsoft Paint), glue the screen capture into the editorial manager, and save the document from that point.
You can also set the PrtScn button to open the Snapshot and Sketch Tool by going to **Settings> Easy Access> Keyboard and enable . Use the PrtScn button to open the screenshot under the print screen.

Windows key + print screen
Tap the Windows + Print Screen button to capture your entire screen and automatically save the screenshot. Your screen will go dark for a moment to indicate that you just took a screenshot, and the screenshot is saved in the Pictures> Screenshots folder.
Windows key + Shift-S
You can also use the keyboard shortcut Windows Key + Shift-S (or the New Screen Clipping button in the Action Center) to take a screenshot with Snip & Sketch. Your screen will get darker and at the top of the screen, you will see Snip & Sketch’s little menu where you can choose what type of screenshot you want to take.
Alt + print screen
Use the keyboard shortcut Alt + PrtScn to take a quick screenshot of the active window. This will capture your currently active window and copy the screenshot to the clipboard. You have to open the recording in an image editor to save it.
Frequently asked questions (FAQs)
1. How do you take screenshots on laptops?
- To take a screenshot of the entire screen, press the Print Screen or PrtSc button.
- If you want to take a screenshot of an active window, press Alt + PrtScn.
2. What is the alternate route to take a screen capture on a PC?
Use the keyboard shortcut: Alt + PrtScn
You can similarly take screen catches of the power window. Open the window you need to catch and press Alt + PrtScn on your console. The screenshot is saved in the clipboard.
3. Why can't I take a screenshot under Windows 10?
Check for an F-mode or F-lock key on the keyboard. If there is an F-mode key or an F-lock key on your keyboard, the print screen may not work Windows 10 can be caused by these as these keys can disable the print screen key. In this case, you should activate the Print Screen button by pressing the F Mode or F Lock button again.
4. How do you take screenshots in Google Chrome?
How to take a screenshot on an Android device:
- Open the site you want to collect.
- Press the On / Off button for a few seconds. Then tap Screenshot.
- Your device takes a picture of the screen and saves it.
- You will see the screenshot at the top of the screen.
5. How do I use the print screen in Windows 7?
- Open the Snipping Tool. Press the Esc key and open the menu that you want to record.
- Press Ctrl + Print Key.
- Click the arrow next to New and choose Freeform, Rectangular, Window, or Full Screen.
- Take a section from the menu.
Re: How do you take screenshots in Google Chrome? (for Windows)
Other alternative solution is by using the Chrome Developer Tools. Using Chrome Developer tools, you can take full page screenshots, or even a screenshot of a specific element without downloading any other browser extensions.
How to use the Chrome Devtools Capture Screenshot tool
- Open the Chrome Developer Tools by clicking the More icon (3 dots in the top right of the browser), then click More tools > Developer tools or use the following shorts
-
Press CTRL + Shift + I
-
Press F12
- a. Type screenshot into the Command Menu (shortcut: CTRL + Shift + P)
Select Capture full size screenshot. This captures the entire page, including what is outside of the visible viewport or choose area screenshot for capturing specific section of the page.

b. or Toggle the device mode toolbar icon and choose your device preference (responsive, mobile, laptop etc)

Then, click on the More Options icon (3 dots in the Device Toolbar), then select Capture full size screenshot or Capture Screenshot .

Chrome will automatically save the screenshot in PNG format to your default downloads folder.
simply press Window Button+Print Screen
Taking the screenshot is the an important skill for the young people or parents to the have. This article would show you how to the Screenshot an image on the yours mobile phone, computer or tablet. Not just are the screenshots useful for the demonstrating computer programs or accessing online resources if you don’t have an internet connection, but they are the essential for the recording evidence of the cyberbullying.
It must be acknowledged this screenshots may be used to the instigate bullying, similar to the they allow the taker of the screenshot to the copy incriminating photos or messages. However, within the order for the young person to the be prepared to the handle cyberbullying situations, this is the crucial this he/she knows how to the record evidence of the cyberbullying through taking screenshots.
What is the the Screenshot?
But first, what exactly is the the screenshot? the screenshot or screen capture is the the picture taken by the computer, mobile or tablet user, using the device within the question, to the record the visible items displayed on the the screen. The image is the stored similar to the the graphics file. Screenshots may be taken using various programs or by using particular keyboard/button shortcuts.
How to the Take the Screenshot on the the Computer
Windows
• Hit the PrtScn button/ or Print Scrn button, to the take the screenshot of the entire screen: if using Windows, pressing the Print Screen button (located within the top right of the keyboard) would take the screenshot of the yours entire screen. Hitting this button essentially copies an image of the screen to the clipboard. Where does this go? Well, you have to the open Word, Paint or few other image editing program to the view, edit or save the image. for the example, open Word or click Ctrl or v. This is the shortcut instead of the right-clicking the mouse or selecting paste. If you’d similar to the to the capture just the active window press the Alt or PrtScn buttons together or paste into yours document similar to the above.
• Use the Snipping Tool program to the take or edit screenshots: If you’re having difficulty locating or using the Print Screen key you might prefer to the use Snipping Tool. Snipping Tool is the program this is the included for the free with the Windows 7, Windows Vista, or the number of the other Windows products. this allows you to the take screenshots easily by clicking New or then selecting the area this you’d similar to the to the screenshot.
You may then edit the screenshot, using highlighter or pen tools. Snipping Tool is the just one of the numerous tools available to the assist you within the taking screenshots. few laptops, within the particular, mightn’t have the PrtScn key. The user manual this came with the yours machine should have instructions on the different key combinations this may be used for the taking screenshots.
Mac
• Hit the Command, Shift or 3 keys together to the take the screenshot of the the entire screen: if using Mac, pressing the Command, Shift or 3 buttons together would take the screenshot of the yours entire screen. This screenshot would be automatically saved to the yours desktop. Press the Command, Shift or 4 keys together to the take the screenshot of the selected area.
• Use the Grab tool to the take the screenshot: An alternative to the keyboard shortcuts on the Mac is the to the use the Grab tool. Grab is the program this is the included for the free with the Macs. this allows you to the take screenshots easily by clicking Capture or then selecting the type of the screenshot this you’d similar to the to the take. Grab is the just one of the the numerous tools available to the assist you within the taking screenshots.
How to the Take the Screenshot on the Smartphone/Tablet
How to the take the screenshot on the the smartphone or tablet varies depending on the the operating system or device used. The easiest way to the find out how to the screenshot on the yours individual device is the to the search online. The following videos, available on the Youtube, show how to the take screenshots with the few of the most popular phones or tablets. Generally speaking, to the take the screenshot on the phone or tablet, you press the power key or the home button at the same time. Yours screenshot would add itself to the yours gallery.
How to the Take the Screenrecord on the Phone
Please be aware this many phones nowadays may screen record, meaning this they may record videos of the screen. the third party app is the needed for the Android phones or older IoS phones. The Apple iOS 11 or later, has built-in screen record capabilities. These may be turned on the by going to the Settings/ Control Centre/ Customise Controls/ Screen Recording. You may access the screen recording feature within the yours control panel by swiping up on the home screen. Recordings are the saved onto the camera roll.
Taking the screenshot is the quick or easy way to the capture part of the or the entirety of the yours display, from the an image you want to the annotate or share to the an online receipt you’d similar to the to the snip or save. within the Windows 10 ($120 at the Amazon), there is the pair of the built-in tools – Snip & Sketch or Snipping Tool – similar to the well similar to the the number of the keyboard shortcuts for the capturing screenshots.
Microsoft introduced the Snip & Sketch tool for the taking screenshots within the Windows 10 the couple years ago, but just recently made the change to the app this has finally led me to the embrace this or say goodbye to the tried-and-true Snipping Tool. (No hard feelings, Snipping Tool. We had the good run together.)
The Snip & Sketch tool is the easier to the access, share or annotate screenshots than the old Snipping Tool. or this may now capture the screenshot of the window on the yours desktop, the surprising omission if the app was first introduced this kept me on the Team Snipping Tool until recently.
The easiest way to the call up Snip & Sketch is the with the keyboard shortcut Windows key + Shift + S. You may also find the Snip & Sketch tool listed within the in the alphabetical list of the apps accessed from the the Start button similar to the well similar to the within the notification panel where this listed similar to the Screen snip. Or you may just search for the this if you don’t commit the keyboard shortcut to the memory. (If you’re regular screenshot taker, I recommend pinning the app to the taskbar.)
The built-in Snip & Sketch app has finally won me over or is the now my go-to method for the taking screenshots within the Windows 10. So long, Snipping Tool.
Screenshot by Matt Elliott/CNET
Either the keyboard shortcut or the notification button would dim yours screen or open the tiny menu at the the top of the yours screen this lets you choose which type of the screenshot you want to the take – rectangular, free-form, window or full-screen. Once you take yours screenshot, this would be saved to the yours clipboard or show up momentarily similar to the the notification within the lower-right corner of the yours screen. Click the notification to the open the screenshot within the Snip & Sketch app to the annotate, save or share it. (If you miss the notification, open the notification panel or you’ll see this sitting there.
If you open Snip & Sketch from the Start menu or by searching for the it, this would open the Snip & Sketch window instead of the small panel at the the top of the screen. from the here, you need to the click the New button within the upper-left to the initiate the screen capture or open the small panel. It’s an extra step to the proceed this way, but this also lets you delay the screenshot. Click the down-arrow button next to the New button to the delay the snip for the 3 or 10 seconds.
Snipping Tool
The Snipping Tool has been around since Windows Vista. Windows has warned for the couple years this the Snipping Tool is the moving away, but it’s still kicking around. The Snipping Tool has been delisted from the the list of the apps from the the Start menu, but it’s easily accessible via the search bar.
Click the New button to the begin the screenshot process. The default snip type is the rectangular snip, but you may also take free-form, full-screen or window snips. The Snipping Tool does not automatically save yours screenshots – you would need to the manually save them within the tool before you exit – or this does automatically copy yours captures to the clipboard.
To capture yours entire screen, tap the Print Screen (sometimes labeled PrtScn) key. yours screenshot would not be saved similar to the file, but this would be copied to the clipboard. You’ll need to the open an image editing tool (such similar to the Microsoft Paint), paste the screenshot within the the editor or save the file from the there.
You may also set the PrtScn button to the open the Snip & Sketch tool by going to the Settings > Ease of the Access > Keyboard or toggling on the Use the PrtScn button to the open screen snipping under Print Screen Shortcut.
To capture yours entire screen or automatically save the screenshot, tap the Windows key + Print Screen key. yours screen would briefly go dim to the indicate this you’ve just taken the screenshot, or the screenshot would be saved to the Pictures > Screenshots folder.
Alt + Print Screen
To take the quick screenshot of the active window, use the keyboard shortcut Alt + PrtScn. This would snap yours currently active window or copy the screenshot to the the clipboard. You’ll need to the open the shot within the an image editor to the save it.
Game bar
You may use the Game bar to the snap the screenshot, whether you’re within the the middle of the playing the game or not. Hit the Windows key + G key to the call up the Game bar. from the here, you may click the screenshot button within the Game bar or use the default keyboard shortcut Windows key + Alt + PrtScn to the snap the full-screen screenshot. to the set yours own Game bar screenshot keyboard shortcut, to the Settings > Gaming > Game bar. Backing up the bit, you’ll also need to the enable Game bar from the this settings page by making sure you’ve toggled on the Record game clips, screenshots, or broadcast using Game bar.
Windows Logo + Volume Down
If you’re rocking the Microsoft Surface device, you may use the physical (well, sort of the physical) buttons to the take the screenshot of the yours entire screen – similar to the how you would take the screenshot on the any other phone or tablet. to the do this, hold down the Windows Logo touch button at the bottom of the yours Surface screen or hit the physical volume-down button on the side of the tablet. The screen would dim briefly or the screenshot would be automatically saved to the Pictures > Screenshots folder.